2019 Sprinter 144 Basic Build

Daniel

Staff Member
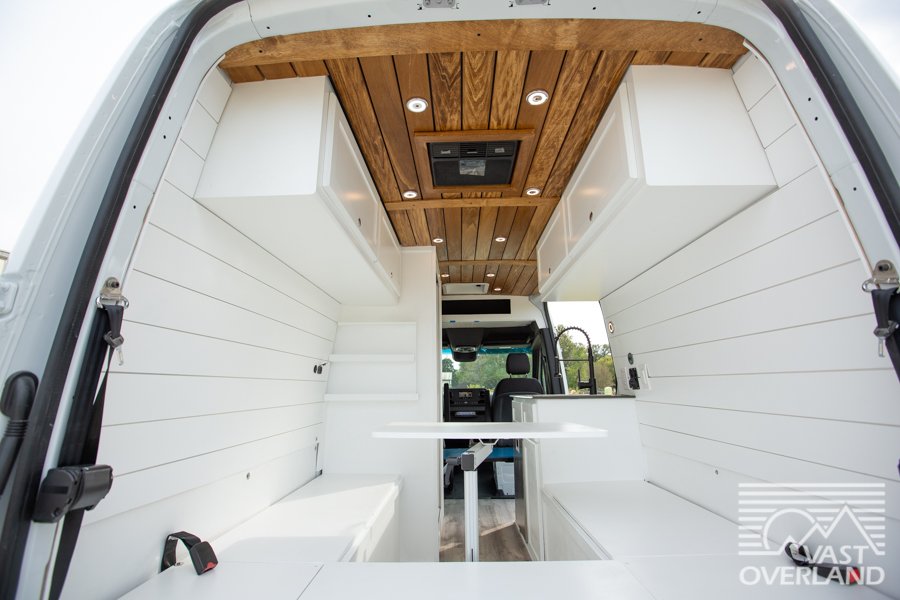
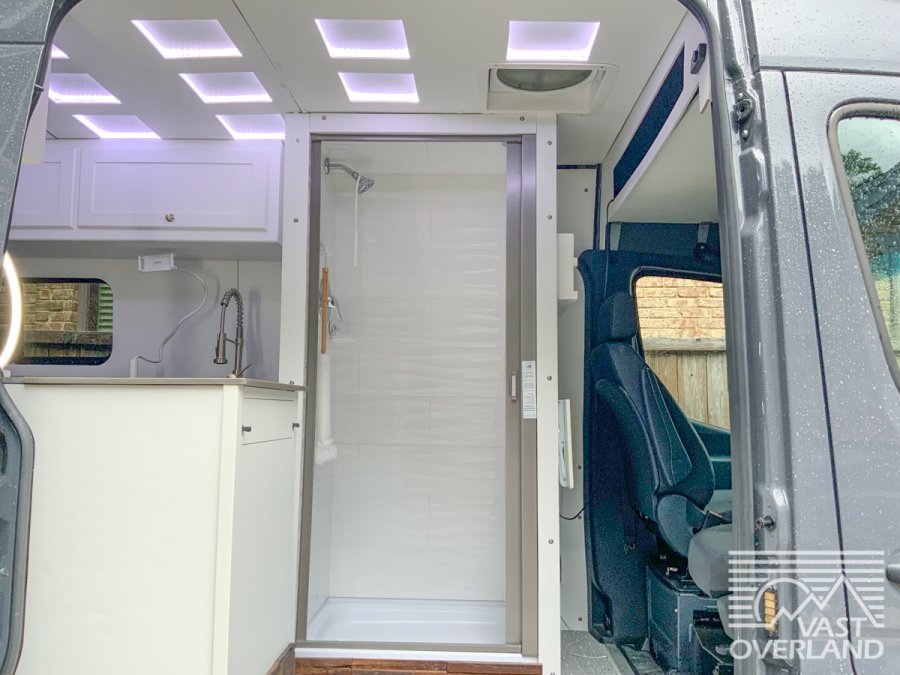
With the opening of our new shop we welcomed in a white 144 Wheel Base Sprinter. After going over the basics of the build once more with our client she left her van in our hands to build out her dream weekend explorer. She also plans to use it on longer trips as well in the future so we are adding in a few things that will make those longer trips better.
A006F2A4-733B-4503-B56F-4085DD3B7E68.jpeg
 
8AEC470B-E675-42A3-B2D8-66A7E6078A2E.jpeg


The first thing I did is remove the seats to access the two areas we will be adding the auxiliary battery and components.

Important: Before removing the seats you MUST disconnect the power to the vehicle. If you do not do this first you take a chance of throwing an code and you would have to use an OBD to clear it or take it to dealer and pay to clear the code.

D31CEC60-9AA7-43A7-9966-7DF636CA1C8A.jpeg


There is a power disconnect post located behind the lower dash panel. Remove the front floor pieces to access the screws holding lower dash. You can then depress the connector to disconnect the power.

Note: Remove fuse #32 from the fuse panel located in the driver seat base as it will continue to power ignition by the emergency backup battery.

D2F295AB-C64B-4A39-8776-5913D9590395.jpeg
6648765C-8B17-4068-91C6-E5CE26FC8F47.jpeg


You can now disconnect the power to the seats.

78FCA873-6087-4B54-AA52-9E59D0CF7A1F.jpeg


Each seat has four bolts, use a torx bit to remove them.

DBC291EA-6F9A-4261-B4AD-866AC07B5EAB.jpeg


DBA0B573-2BFC-4CC3-8085-70CC74EA0055.jpeg


The drivers side seat has the power distribution and other wiring under it. We will connect to an empty slot on the power buss for the Victron Energy Orion-Tr Smart DC/DC charger.

274D2A8C-5EF0-4CDE-AD48-2374B970546B.jpeg
 
Fitting some of the main components under the passenger team really takes some thought on functionality. The Victron Phoenix 12/1200 is pretty large so we will create a base mount with an open channel under it for better air flow/cooling.

vast_overland_7007.jpg
vast_overland_7008.jpg
vast_overland_7010.jpg

vast_overland_7011.jpg
vast_overland_7014.jpg


vast_overland_7015.jpg
vast_overland_7017.jpg


vast_overland_7018.jpg


vast_overland_7031.jpg


vast_overland_7021.jpg
 
Last edited:
vast_overland_7047.jpg


I fabricated up an aluminum plate for the seat base that will allow the access to the Blue Sea battery on/off switch. I will clean this up and paint it in a matte black paint.

vast_overland_7048.jpg
vast_overland_7050.jpg


I fabricated a cover that will only expose the on/off switch. Once removed you can then access more parts of the system. I will paint this cover a rough matte black.

vast_overland_7049.jpg


With the panel open you can access the auxiliary fuse panel.

vast_overland_7051.jpg
 
More electrical today, I pretty much finished building mounts and a wire chase for the wiring that will be under the passenger and driver seats.
DAN_7060.jpg

DAN_7061.jpg

DAN_7062.jpg
DAN_7064.jpg

DAN_7066.jpg
 
Time to get the interior panels out and get some things on the roof installed.
DAN_7091.jpg


One thing about the van wiring is that Mercedes puts the wiring to the rear tail lights, interior lights and backup camera just attached to the outside of the interior walls with little protection for the wiring. I will pull the full rear wiring harness and add wire loom to it and relocate into the interior of the walls to give it a bit more protection before putting the walls up. We will be doing birch walls for this interior.

DAN_7102.jpg


First fan roof hole cut, the client later decided to add two fans so we will cut a second one as well.

DAN_7106.jpg
DAN_7107.jpg
 
We source our solar panel cross bars from Impact products and love how clean and easy their parts for the panels install. Everything labeled and even a sample is sent assembled.
DAN_7110.jpg
DAN_7112.jpg
DAN_7114.jpg

DAN_7117.jpg
DAN_7116.jpg
DAN_7115.jpg
DAN_7119.jpg


DAN_7120.jpg
DAN_7122.jpg
DAN_7125.jpg
 
Next up I will make some mounts for some exterior Rigid Scene lights that the client can turn on to light up her camp spot.

Sprinter-van-conversion-houston_tx-1.jpg
Sprinter-van-conversion-houston_tx-2.jpg
Sprinter-van-conversion-houston_tx-3.jpg
Sprinter-van-conversion-houston_tx-4.jpg


Testing the light mount and angle, after the initial look I decided to make the mounts a bit taller.

Sprinter-van-conversion-houston_tx-5.jpg


Sprinter-van-conversion-houston_tx-7.jpg
Sprinter-van-conversion-houston_tx-6.jpg
 
Next up is the bed platform made from steel bed rails and aluminum cross members to save a bit of weight.
(Note: UPDATE post is from 2021 and We now in 2023 build fully TIG welded modules)

Sprinter-van-conversion-houston_tx-8.jpg

Sprinter-van-conversion-houston_tx-9.jpg


I used a piece of wood the same thickness as the wall panels to make sure there is enough clearance once installed.

Sprinter-van-conversion-houston_tx-10.jpg


The locations for the rails are spaced so that two sections of 3/4" birch can be used and spaced accordingly.

Sprinter-van-conversion-houston_tx-11.jpg
Sprinter-van-conversion-houston_tx-12.jpg
Sprinter-van-conversion-houston_tx-13.jpg
 
Last edited:
Rails and cross members are installed using plus nuts put in with a pneumatic tool.
Sprinter-van-conversion-houston_tx-14.jpg
Sprinter-van-conversion-houston_tx-15.jpg


I use rivnuts for basic mounts but I choose to use Plus Nuts for things that need to hold more weight.

Sprinter-van-conversion-houston_tx-16.jpg


Test fitting of all the rails and making sure it is level.

Sprinter-van-conversion-houston_tx-17.jpg
Sprinter-van-conversion-houston_tx-18.jpg
Sprinter-van-conversion-houston_tx-19.jpg
 
I made the rear most bed panel top angled to follow the curve of the rear doors and corners of the van to get the most out of the space possible.
Sprinter-van-conversion-houston_tx-21.jpg
Sprinter-van-conversion-houston_tx-22.jpg


Another test fit and level to double check.

Sprinter-van-conversion-houston_tx-23.jpg


All good so now I will disassemble and get the pieces painted.

Sprinter-van-conversion-houston_tx-24.jpg
 
Back
Top